Introduction
This document comes out of working for an idea in AWS, that of providing simple instructions to allow a X window/VNC GUI to function on an AWS free tier Linux instance, in this case Red Hat Enterprise Linux 8. If a Red Hat instance has at least 2GB, the standard GUI Desktop or “Server with GUI” will work with all of the Gnome Desktop packages installed. If those packages are installed on the 1GB Memory configuration, the system will slow to a standstill, and because of a lack of memory become impossible to use.
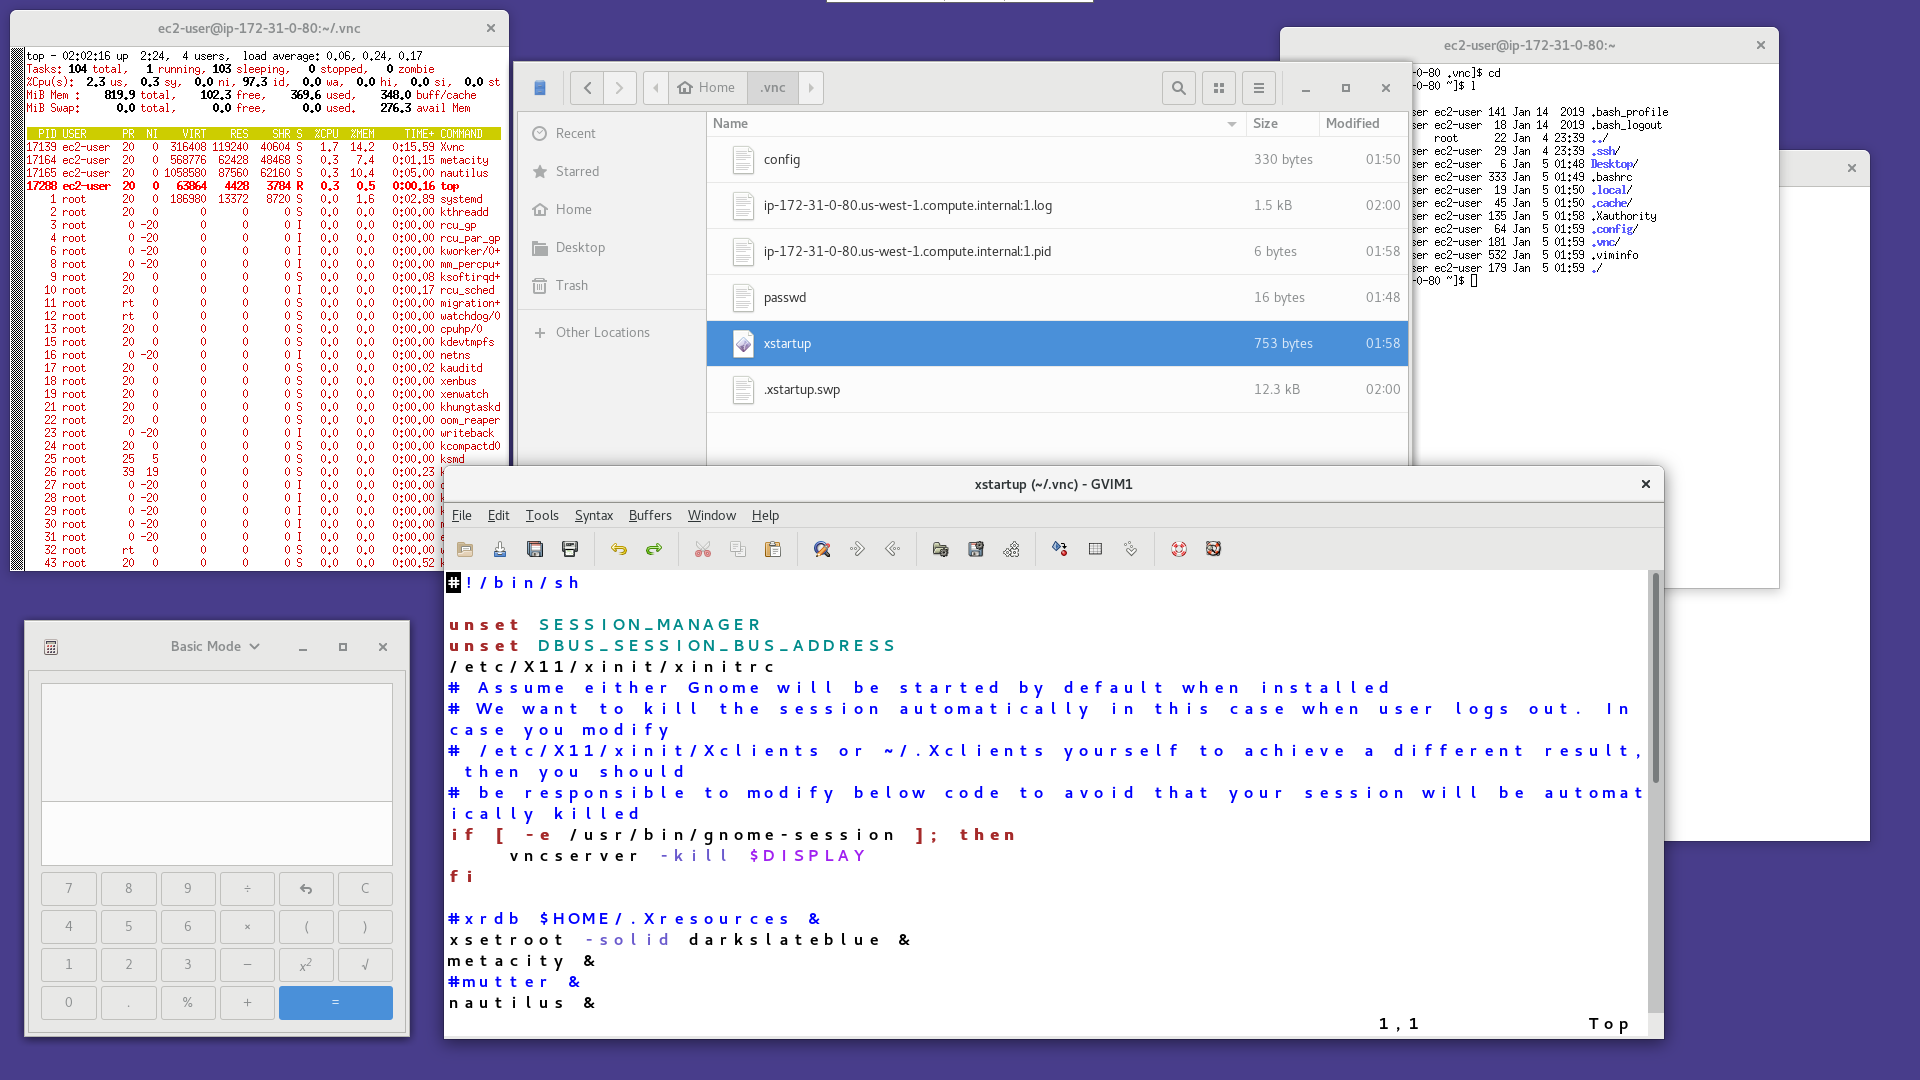
These instructions therefore, aren’t necessarily needed for EC2 instances on t2.small or greater virtual machines, unless speed is of a concern. This is a very minimal desktop with the following X window applications running: xterm, Gnome Calculator, Nautilus File Manager, and GVim for a graphical Vim text editor. Other X window programs can be installed, as needed, but care must be taken not to install Firefox or the full Gnome suite as this could make the instance unusable.
Instructions for connecting using SSH, or for starting the TigerVNC service during startup are in the link that follows at the end of the document. This document only covers the initial installation of the files necessary for a simple setup.
Creating AWS EC2 Instance
Steps for AWS EC2 InstanceAdd a Tag if desired, and move on to “Step 6:Configure Security Group”. Either create a new security group, or select an existing security group with settings previously configured. If creating a new security group, add two “Custom TCP” Rules with the port range 5900 and 5901. Set the connection source as “0.0.0.0/0” to allow a connection from anywhere on the internet, or to constrain to connection to come from a specific IP address enter that here. If this isn’t set correctly, a connection might not be able to be made. Set the description for both rules to “VNC”, and click on “Review and Launch” and then “Launch.”
A new key pair can be created to connect to the instance, or use a previous key pair can be used that already exists. This is left up to the user. To connect with Putty, convert the key pair file from a .pem file to a .ppk, and connect to the public DNS address. Make an SSH connection to the instance, and login as “ec2-user”.
The instance will take a few minutes to boot until it is ready. Once the instance is running, connect to the instance.
Modify and Install Packages
In addition to adding a Red Hat Enterprise Linux repository, we’ll be installing the TigerVNC server, necessary X window packages in order to connect to the instance. We’ll also be creating the directory “$HOME/.config/nautilus” as well as “$HOME/Desktop” for Nautilus to find if it does not exist already. We will be using Metacity as the Window Manager. It’s a minimal GTK2 Window Manager, so GTK2 and GTK3 libraries may be installed as a dependency as well.
Lastly, we’ll be running the vncserver with suggested screen size, and verifying that the display, “:1” is loaded before continuing.
1. sudo yum install -y https://dl.fedoraproject.org/pub/epel/epel-release-latest-8.noarch.rpm
2. sudo yum install -y tigervnc-server tigervnc xterm metacity nautilus gnome-calculator gvim (~1m 4.4 seconds)
3. mkdir -p $HOME/.config/nautilus
4. mkdir $HOME/Desktop
5. vncserver -autokill
6. Add entries to $HOME/.vnc/xstartup file. See below.
7. vncserver -geometry 1920x1080 :1
8. vncserver -list
Modify and add to the end of $HOME/.vnc/xstartup the following commands. Do this after “vncserver -autokill” at step 6 above, before running vncserver, so that the initial “xstartup” file has been created. If this step isn’t followed, a blank screen will display when connecting with VNC as this window manager doesn’t load a method to run other programs.
#xrdb $HOME/.Xresources &

xsetroot -solid darkslateblue &

metacity &

nautilus &

gnome-calculator &

xterm -geometry 80x40+10+10 -fg black -bg white &

xterm -geometry 80x40+100+100 -fg black -bg white &

gvim -geometry 80x40+200+200 &
The geometry values for “vncserver” defaults to 1024×768 if not specified. To set it to default to a known value, modify $HOME/.vnc/config, uncomment and set “geometry=” to a desired value: 1920×1080, 1280×1024, or 1024×768.
Connecting
Connect with VNC Viewer to the IP address. Don’t forget to add “:1” to the end of the IP address, as we’re using display 1 (Port 5901).
If a connection isn’t made, first ensure that the ports 5900 and 5901 are opened for the Inbound Rules in the security group for the AMI. If the source of the incoming traffic is allowed on “0.0.0.0/0”, AWS will display an alert that the port can be accessed by anywhere on the Internet. For higher security, set this value to the IP address that the connection is being made from, or IP address subnet if the IP address is dynamic.
If “vncserver -list” shows the display “:1” available, and a connection can’t be made, the firewall could be preventing the connection. Perform the following commands to configure, start, and open the firewall.
1. systemctl start firewalld

2. firewall-cmd --zone=public --add-port=5900/tcp --permanent

3. firewall-cmd --zone=public --add-port=5901/tcp --permanent

4. firewall-cmd --reload

5. firewall-cmd --list-ports
Tips:
Tips and Helpful Hints- Right-click on text files in the Nautilus File Manager to open them with Gvim.
- If using a 1GB instance, do not install Firefox. If Firefox is loaded the instance will slow to a crawl. The same with installing either the “Desktop” or “Server with GUI” group packages. If using a 2GB or larger AMI EC2 instance this document wouldn’t be needed. Don’t install Gnome Desktop either for the same reason.
- The Nautilus File Manager will allow connections to other server addresses, such as FTP, Samba, or SSH FTP, under “+ Other Locations”.
- The Metacity window manager has 4 workspaces. To change from one to another use Ctrl+Alt+{Left/Right Arrows}.
- To increase the font size of Xterm windows, hold Control+RightClick and select the Font size to use.
- To connect with SSH and more advanced techniques, please see read the additional link below.
- If a little more functionality is desired, install “Gnome-Shell” using yum, and replace “metacity” with “gnome-shell” in the .vnc/xstartup file. It will run a little slower, but allow access to desktop settings.
- For an “old-school” X Window feel, use “twm” instead of Metacity.
Sources:
TigerVNC at ArchLinux Wiki: https://wiki.archlinux.org/index.php/TigerVNC
How to Install and Configure VNC Server on Ubuntu: https://www.tecmint.com/install-and-configure-vnc-server-on-ubuntu/ (appropriate for Red Hat, etc.)
Get the files here: vncsetup.tar.gz
From the command line:
$ curl -O http://twoconcertinas.com/vncsetup.tar.gz
This works on both Red Hat Enterprise Linux 8 and Amazon Linux 2 AMI. Doesn’t currently work on Amazon Linux AMI 2018.03.0.